

Introduction: From Hardware to Code
We have our ESP32 DevKit. We understand its pins, know what GPIO, ADC, PWM, and communication interfaces do, and have a few project ideas in mind.
Where do we actually write the code, compile it, and upload it to the board?
For this series, we will use Visual Studio Code (VS Code) with PlatformIO. This combination gives us a workspace for writing code, managing project configuration, compiling firmware, uploading it to the ESP32, and debugging through serial output.
We will use the same workflow as the projects get more complicated, from blinking an LED to building games on a colour TFT display.
Let’s set everything up.
What Are VS Code and PlatformIO?
Before installing anything, let’s understand the tools.
Visual Studio Code
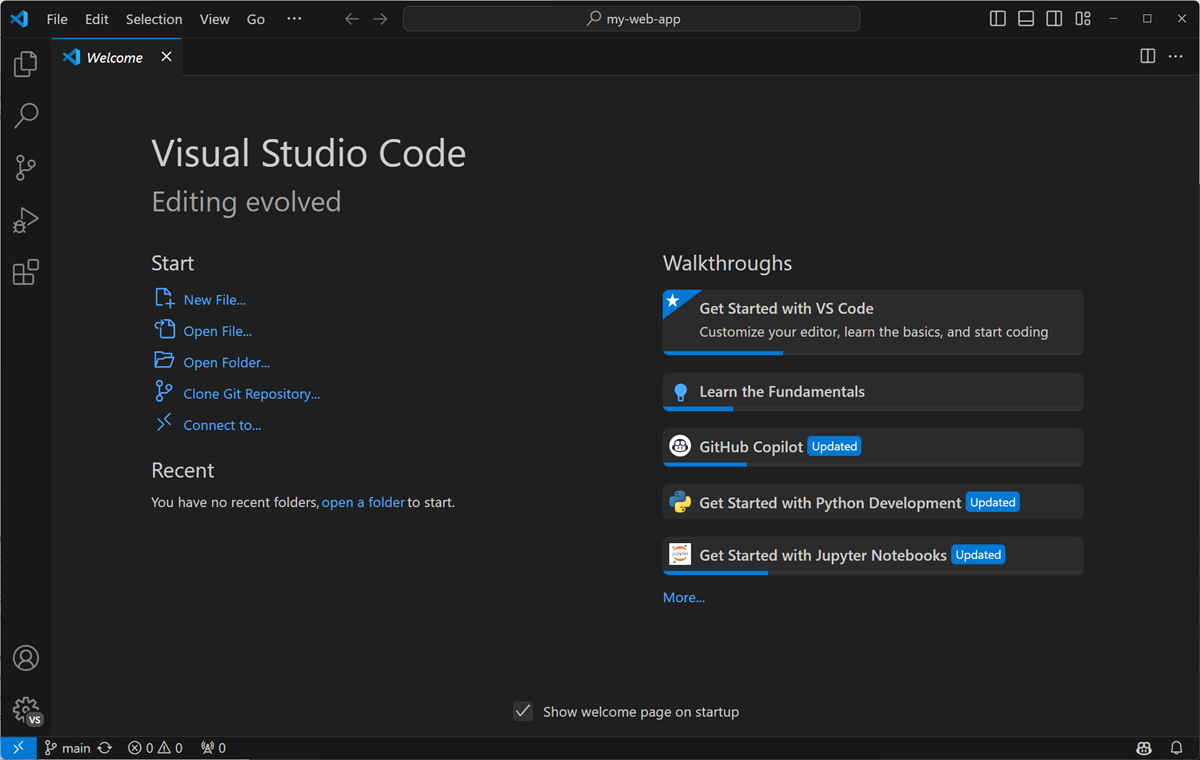
VS Code is a code editor. It provides features such as syntax highlighting, code navigation, search, and extensions.
Think of it as the workspace where we write and organize our programs.
PlatformIO
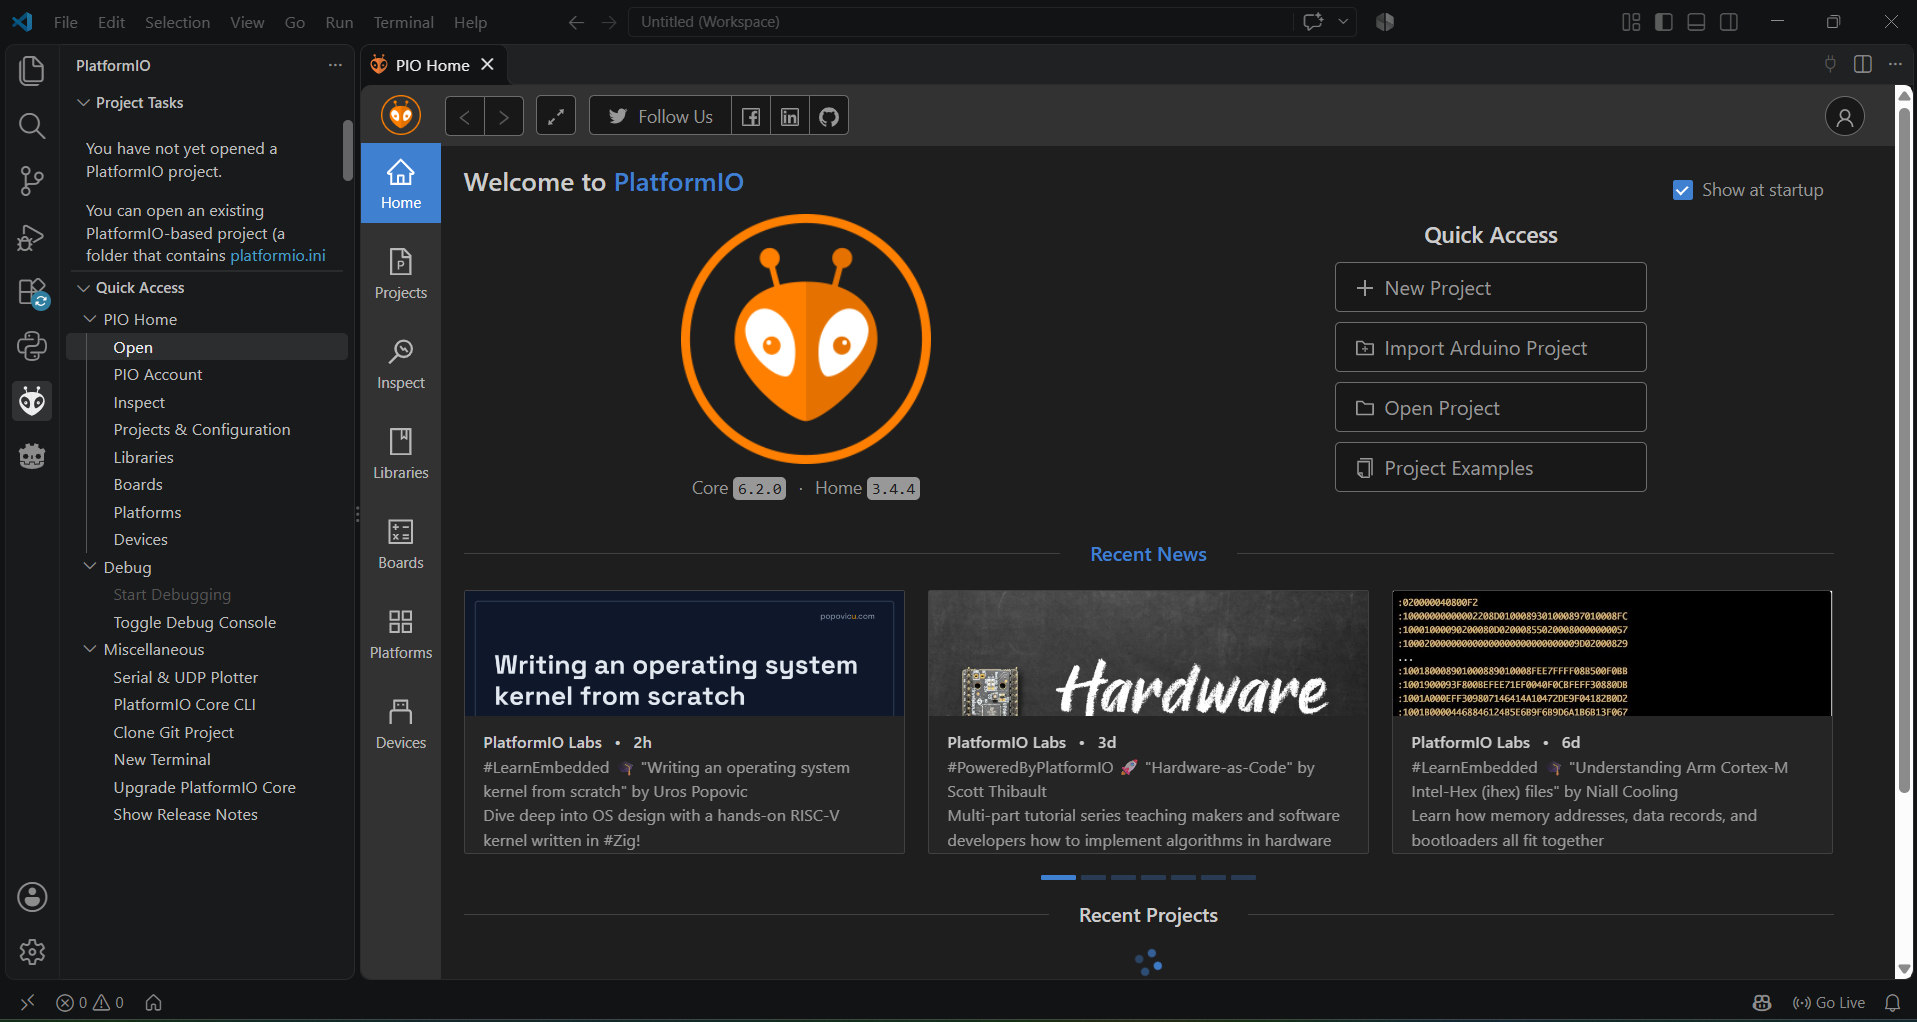
PlatformIO is an embedded development ecosystem. Its VS Code extension, PlatformIO IDE, helps us configure projects, manage dependencies, compile firmware, and upload programs to supported development boards.
Instead of manually assembling every part of the toolchain, PlatformIO manages much of the setup for us.
The Arduino framework
In this series, we’ll use the Arduino framework for ESP32 development.
The framework provides familiar functions such as:
pinMode()to configure a pin.digitalWrite()to set a digital output.digitalRead()to read a digital input.analogRead()to read an analog input.Serial.print()to send text over serial.
We will write our code in C++, use the Arduino framework, and let PlatformIO handle the build and upload workflow.
What You Need
Before starting, keep these ready:
- An ESP32 DevKit using the ESP32-WROOM-32 module.
- A USB cable capable of transferring data.
- A computer running Windows, Linux, or macOS.
- An internet connection for installing tools and downloading dependencies.
Most esp32 use A to B-(Micro USB) [left], but some new versions use A to C [right] cables also. Check your kit before buying the cable.
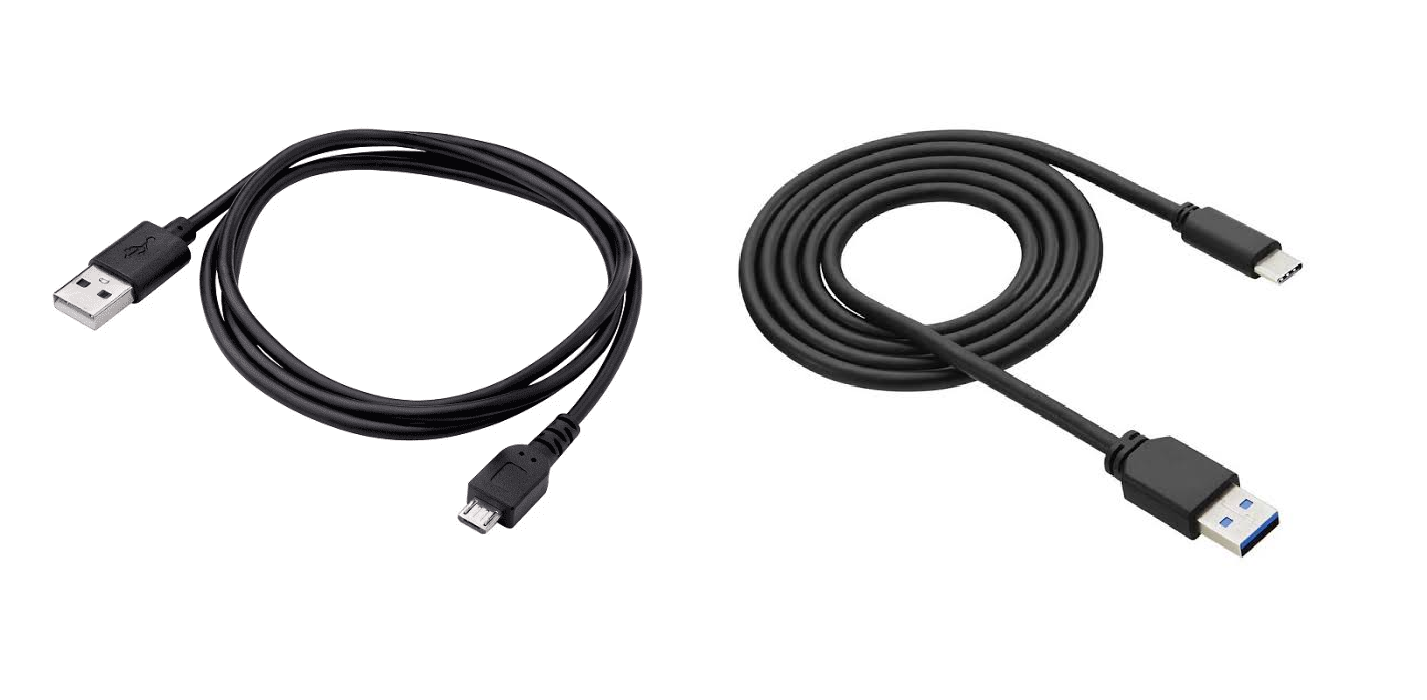
A charging-only USB cable may power the board without allowing your computer to communicate with it. If your board does not appear as a serial device, the cable is one of the first things to check.
Install Visual Studio Code
First, download VS Code from the official website:
https://code.visualstudio.com/
Choose the installer for your operating system and follow the installation instructions.
Once installed, open VS Code.
You should now have a code editor ready for extensions.
Install the PlatformIO IDE Extension
PlatformIO integrates with VS Code through an extension.
- Open VS Code.
- Open the Extensions view from the sidebar.
- Search for PlatformIO IDE.
- Select the extension published by PlatformIO and install it.
- Wait for its initial setup to finish.
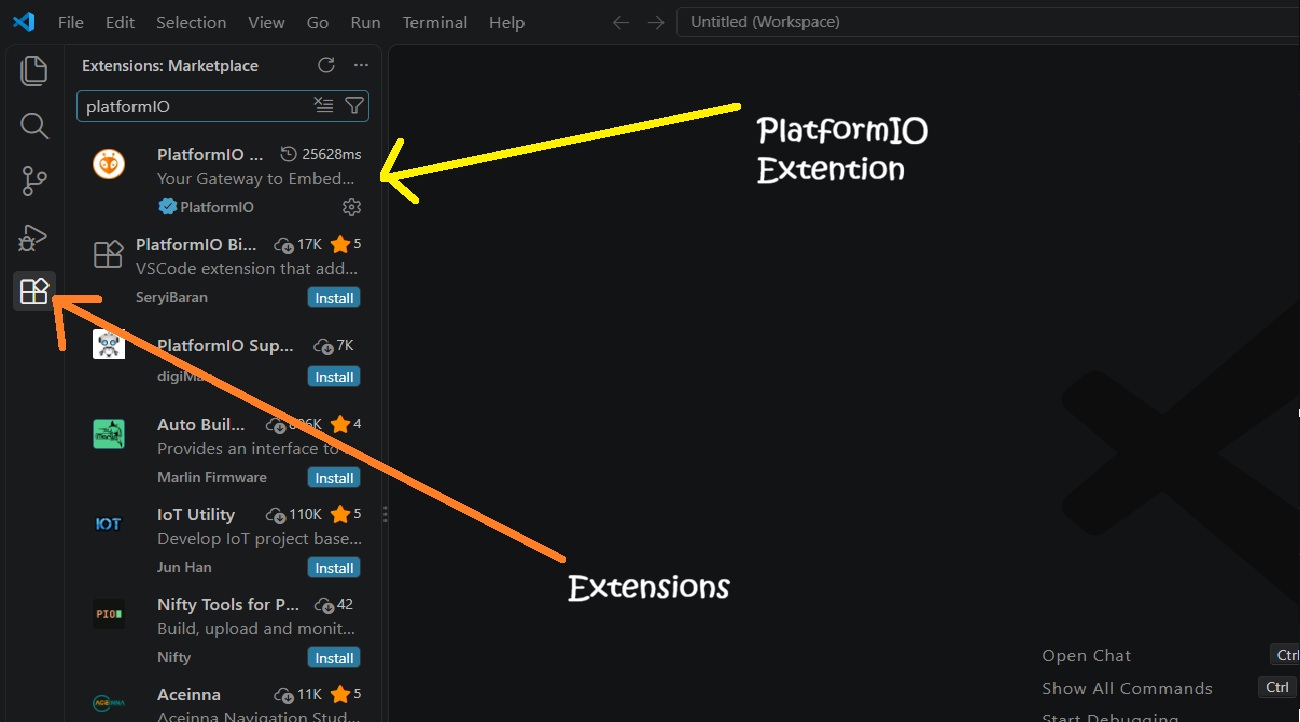
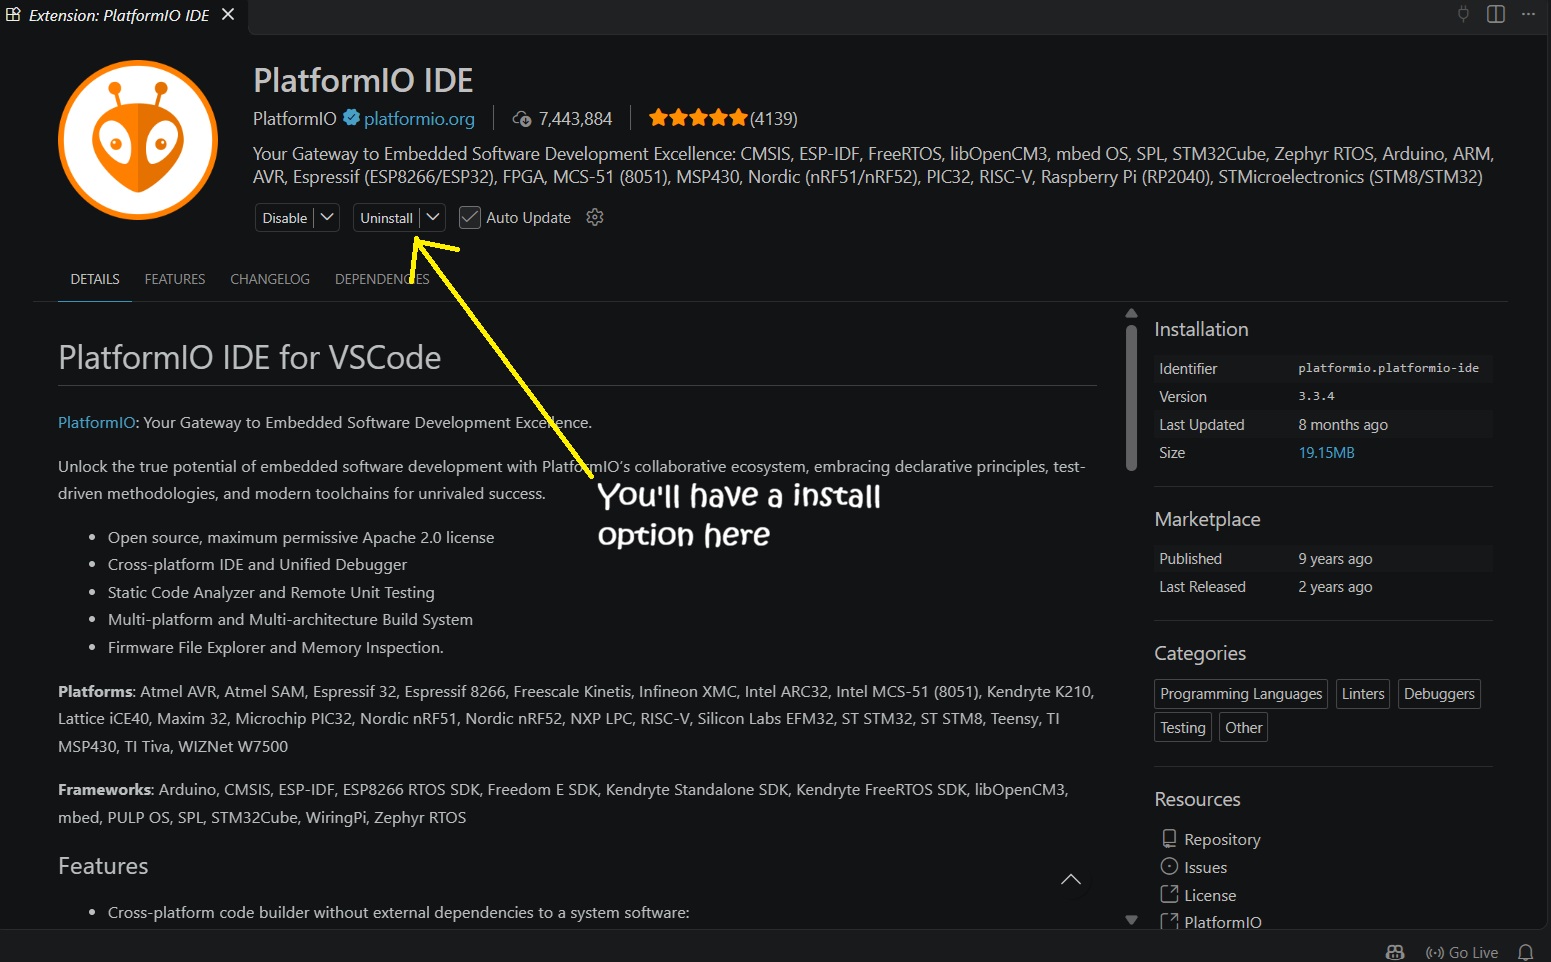
The first setup may take a little while because PlatformIO can download supporting tools and packages.
If it asks you to reload VS Code, do so. Once installation is complete, look for the PlatformIO icon or open PlatformIO Home from the available commands.
You can find the official documentation here:
https://docs.platformio.org/en/latest/integration/ide/vscode.html
At this point, we have the editor and embedded development environment ready.
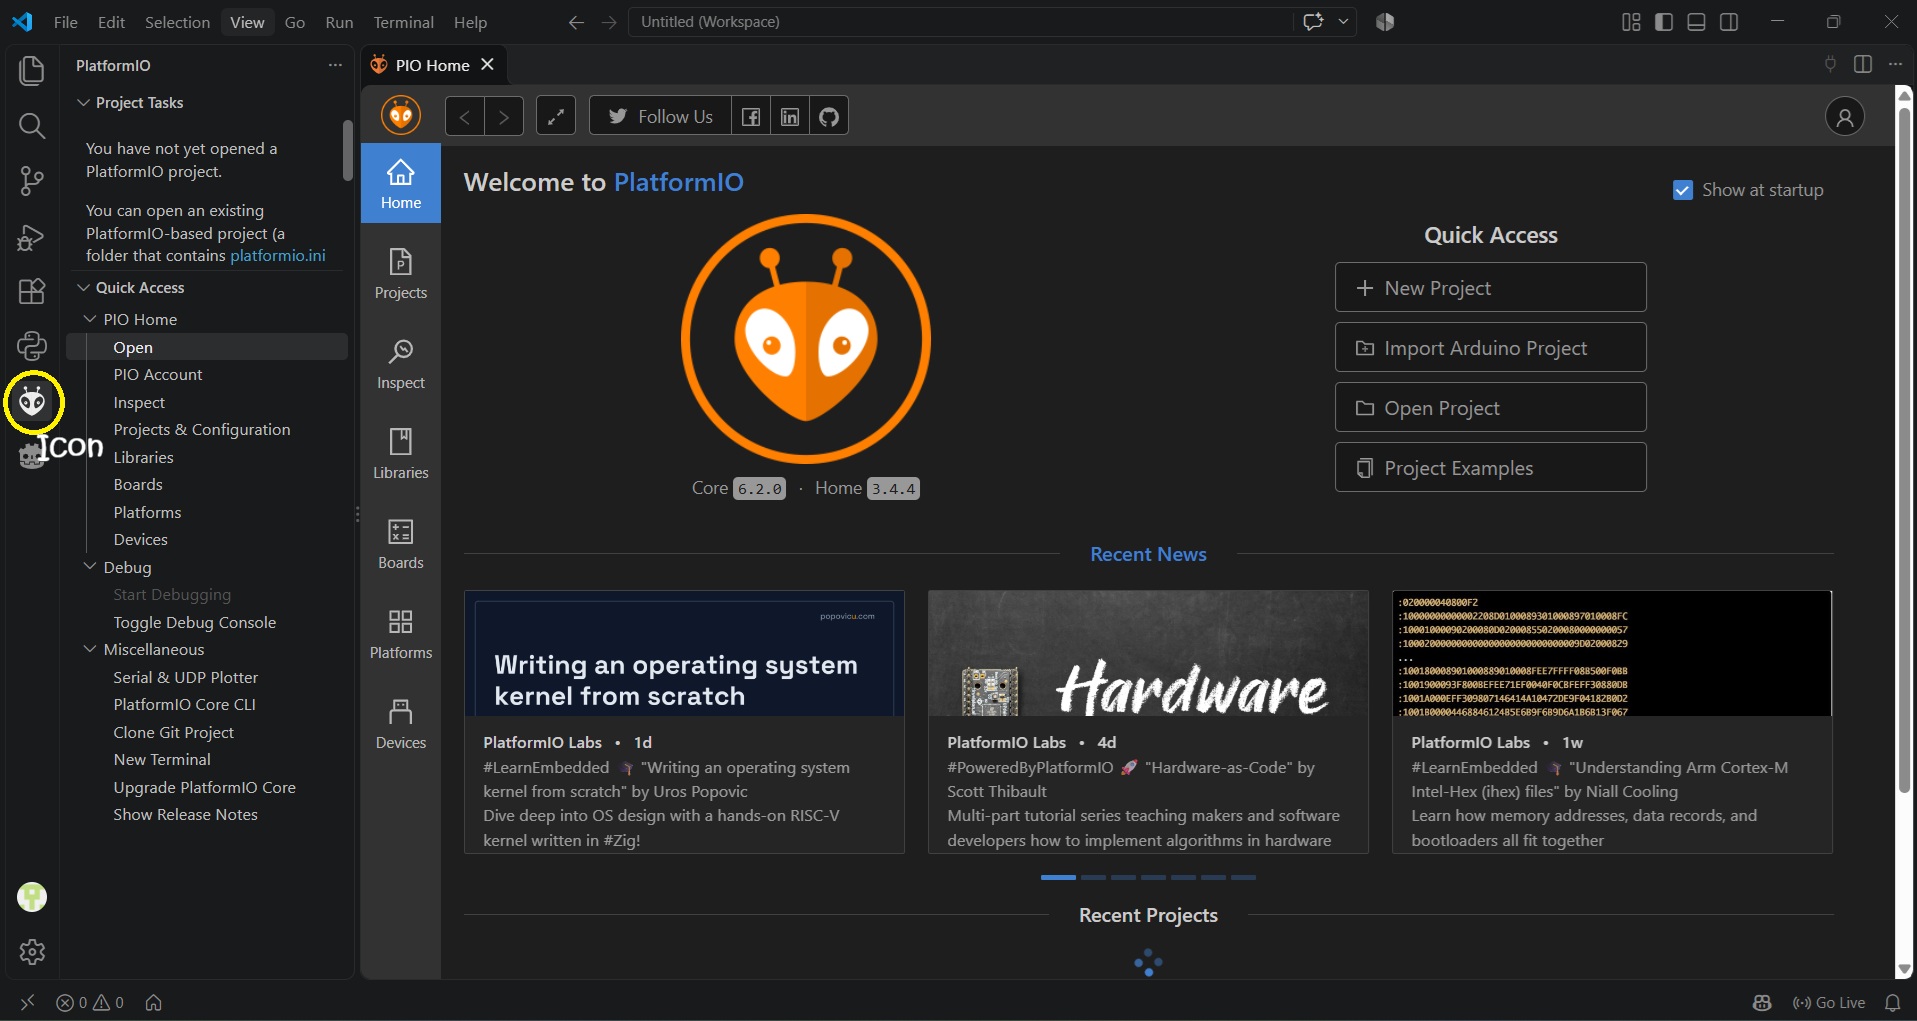
Now let’s create our first project.
Create an ESP32 Project
Open PlatformIO Home and choose New Project.
Configure the project with the following settings:
| Setting | Value |
|---|---|
| Project name | esp32_first_project |
| Board | Espressif ESP32 Dev Module or the matching generic ESP32 Dev Module board definition |
| Framework | Arduino |
The exact board name shown can depend on the installed PlatformIO platform and board definitions.
For our classic ESP32-WROOM-32 DevKit, the generic ESP32 Dev Module definition is commonly suitable. If you have a specific board variant, check its documentation and choose the matching definition when available.
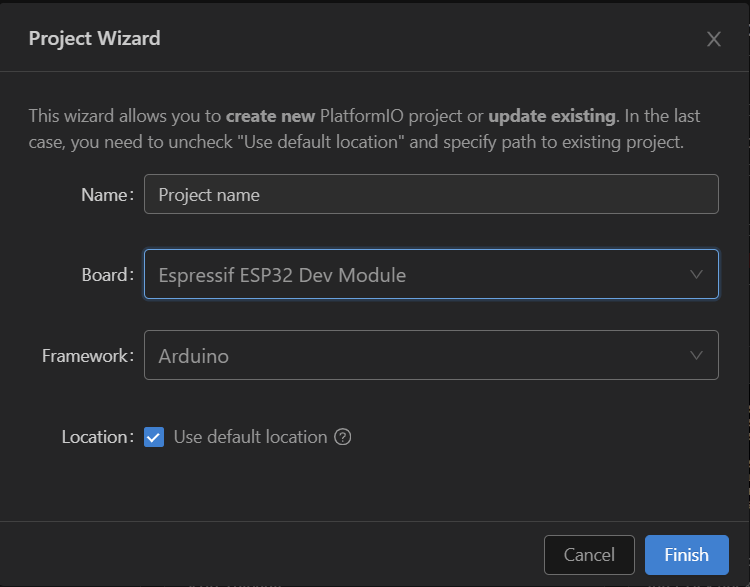
Choose a project location and create the project.
PlatformIO will prepare the project and download the necessary packages. The first build can take longer than later builds because the toolchain and framework may need to be installed.
Understand the Project Structure
When the project opens, you will see a directory structure similar to this:
esp32_first_project/
├── include/
├── lib/
├── src/
│   └── main.cpp
├── test/
└── platformio.ini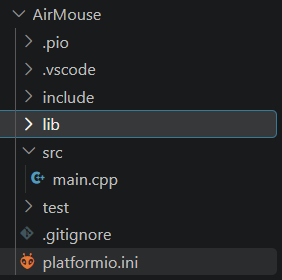
Each part has a purpose.
src/
This is where our main application code lives.
For our project, the most important file is:
src/main.cpp
This is where we will write our ESP32 program.
platformio.ini
This file contains the project’s configuration. It specifies the target environment, framework, and other build or upload settings.
For example: (Put this in your platformio.ini file, it would be needed for the following practice program!)
[env:esp32dev]
platform = espressif32
board = esp32dev
framework = arduino
monitor_speed = 115200
Here is what each line does:
platform: Selects the Espressif ESP32 development platform.board: Selects the board definition.framework: Tells PlatformIO to use Arduino.monitor_speed: Sets the default Serial Monitor baud rate.
The baud rate must match the rate used by Serial.begin() in our program.
include/, lib/, and test/
These directories support larger projects.
include/is commonly used for project header files.lib/can contain project-specific libraries.test/is used for supported testing workflows.
We don’t need to use all of them in our first program. As our projects grow, they will become more useful.
Write Your First ESP32 Program
Let’s start with something simple: printing a message to the Serial Monitor.
Open src/main.cpp and replace its contents with:
#include <Arduino.h>

void setup() {
    Serial.begin(115200);
    Serial.println("Hello from the ESP32!");
}

void loop() {
    Serial.println("ESP32 is running...");
    delay(1000);
}Now let's understand the program.
#include <Arduino.h>
This includes the Arduino framework declarations we need for functions such as Serial.println() and delay().
setup()
The setup() function executes once when the program starts or the board resets.
We initialize serial communication here:
Serial.begin(115200);The number 115200 is the baud rate used for serial communication. The same should be set in the .ini file!
We then print a message:
Serial.println("Hello from the ESP32!");loop()
After setup() finishes, the Arduino framework repeatedly executes loop().
Our program prints a message and waits for one second before repeating.
Serial.println("ESP32 is running...");
delay(1000);
This is a simple program, but it establishes the workflow we will use for debugging more complex systems.
Connect the ESP32 to Your Computer
Connect your ESP32 DevKit to your computer using the USB cable.
Your computer should detect a serial device if the board’s USB-to-serial interface and drivers are working correctly.
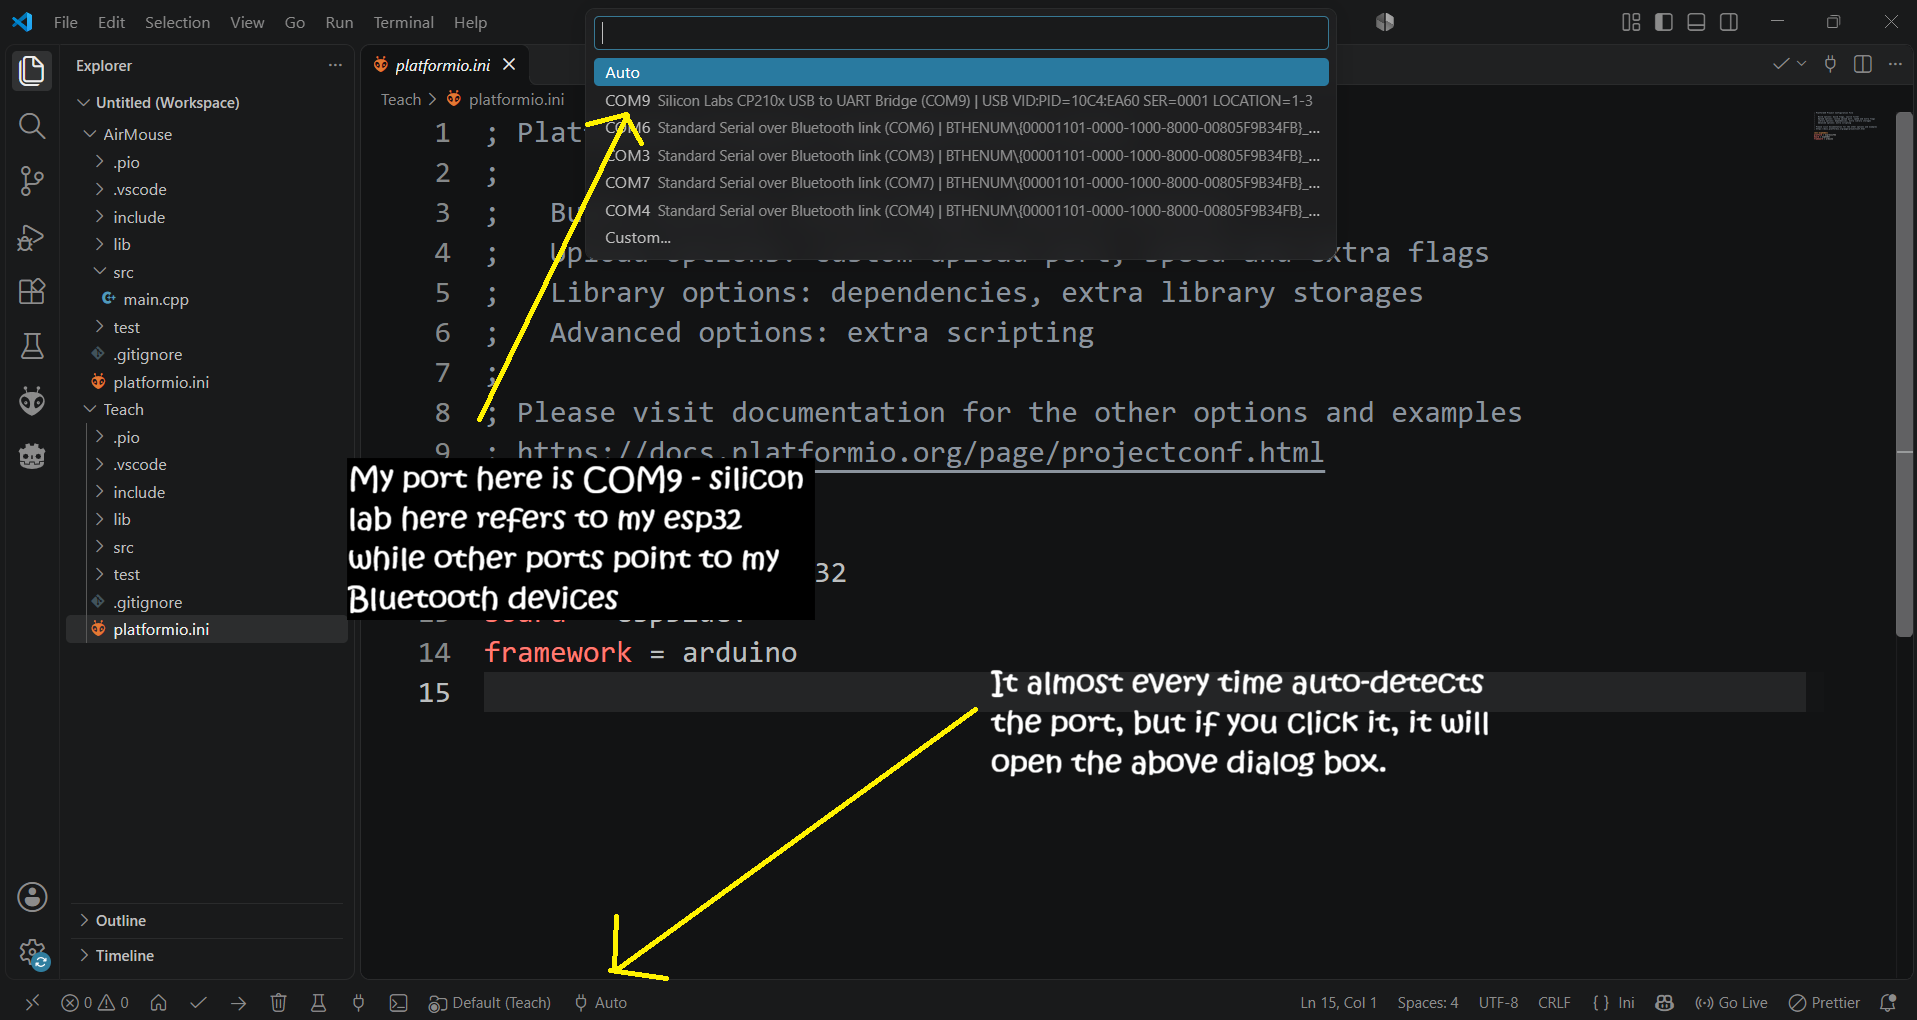
Depending on the board, USB interface, and operating system, the device may appear as a COM port on Windows or a serial device such as /dev/ttyUSB0 or /dev/ttyACM0 on Linux.
If it does not appear, check the following:
- Try a known data-capable USB cable.
- Try another USB port.
- Check whether the board requires a USB-to-serial driver.
- On Linux, check device permissions if the port exists but cannot be opened.
- Confirm that the board is receiving power.
Some newer ESP32 boards have native USB interfaces, so the exact device name and driver requirements can differ.
Important: Do not select a serial port based only on its name. Confirm which port belongs to your connected board.
To know your COM(Port), 1- Keep your device plugged in. 2- Press WIN+X -> Device Manager -> Expand 3- Now, keeping this open, remove your ESP 4- Whichever port disappers is your port
Build and Upload the Program
Now comes the satisfying part: putting our code onto the ESP32.
PlatformIO provides several ways to build and upload a project. In the VS Code interface, you can use the PlatformIO toolbar or open the command palette and search for the relevant PlatformIO commands.
Follow this sequence:
Step 1 — Build
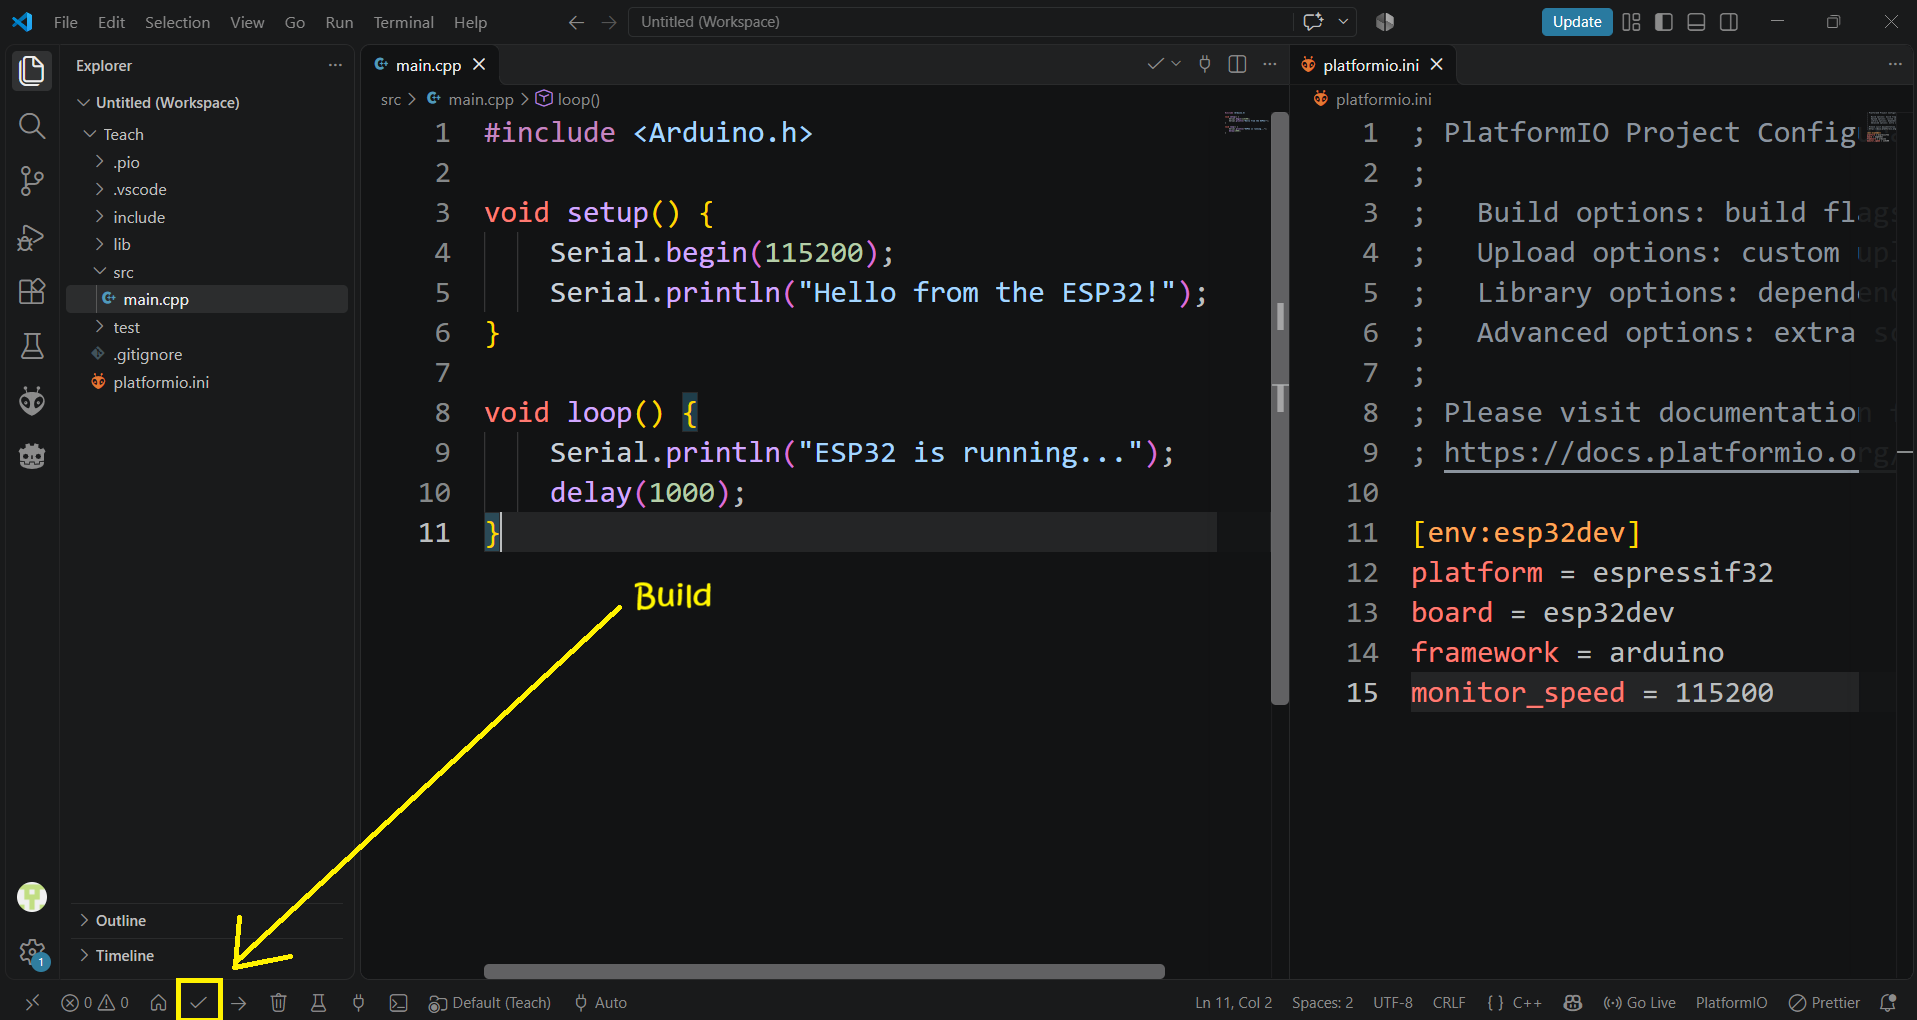
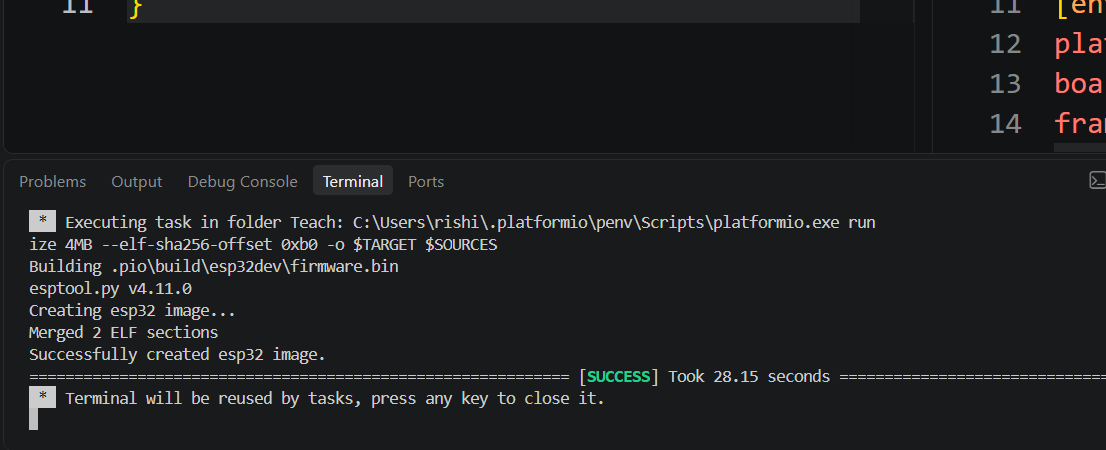
Choose Build.
PlatformIO compiles your source code and prepares the firmware for the selected board.
If there are compilation errors, the terminal will show diagnostic messages. Read the first relevant error rather than immediately changing multiple lines of code.
Step 2 — Upload
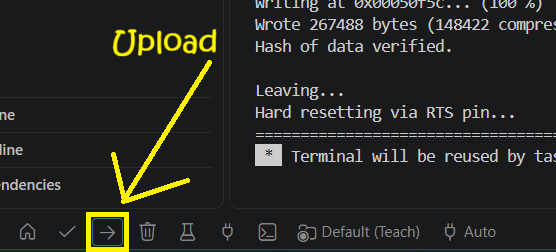
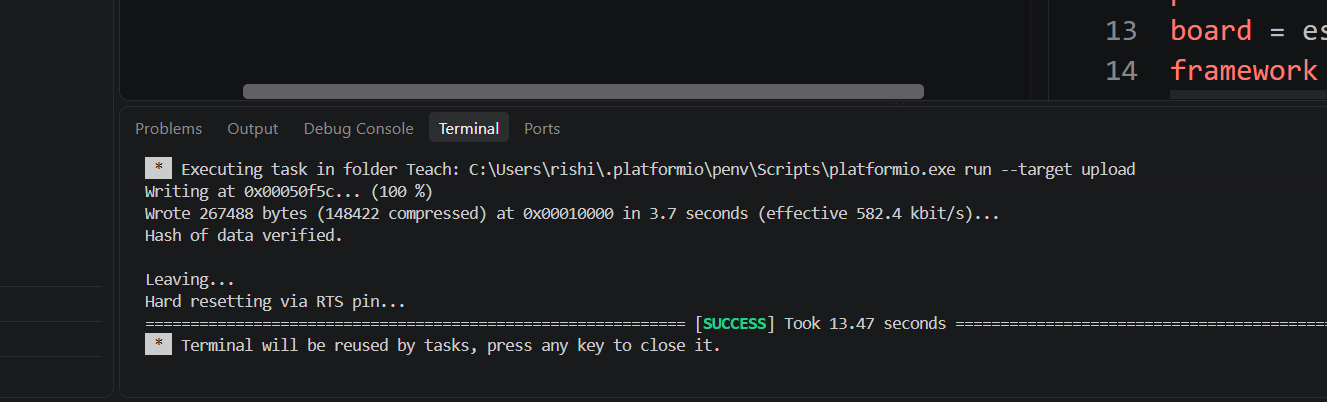
Connect the board and choose Upload.
PlatformIO builds the firmware if needed, then attempts to upload it through the configured serial interface.
Some boards enter download mode automatically. Others may require you to hold the BOOT button during part of the upload process.
Wait for the upload process to finish successfully.
Step 3 — Open the Serial Monitor
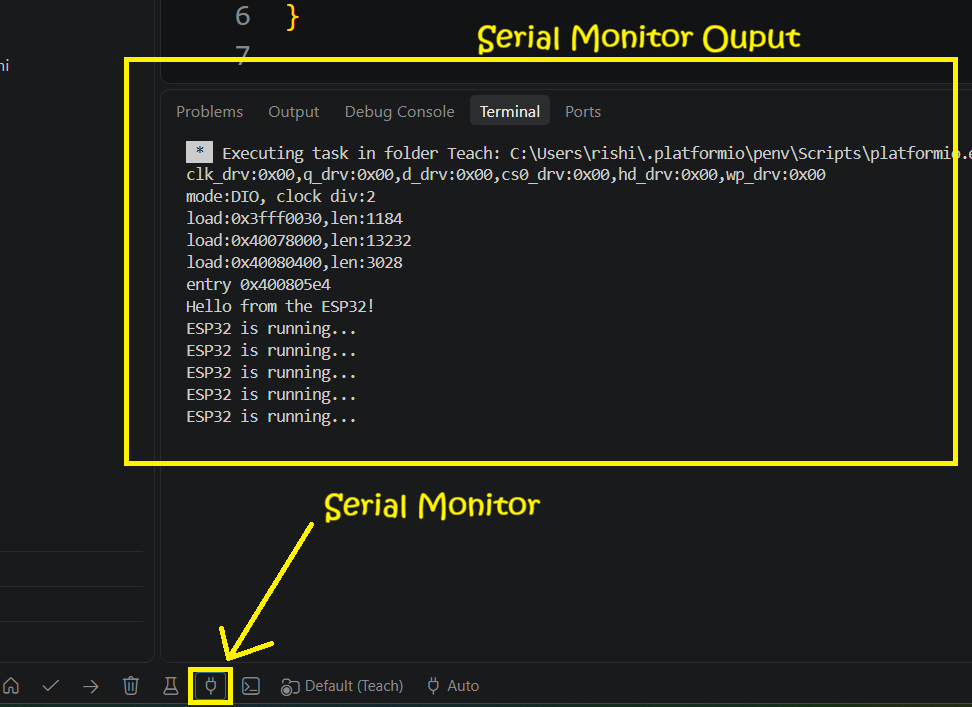
Choose Monitor from the PlatformIO toolbar or run the corresponding PlatformIO command.
You should see output similar to:
Hello from the ESP32!
ESP32 is running...
ESP32 is running...
ESP32 is running...
Congratulations! You have compiled and uploaded your first program using PlatformIO.
If the message appears, the complete workflow is working: code, build tools, upload connection, firmware execution, and serial communication.
Your First Interactive ESP32 Lab
Reading about embedded systems is one thing, but experimenting with them is where things start getting interesting.
For this series, we’ll be introducing SiliconPen Interactive Labs, powered by Wokwi. These labs let you explore circuits, run code, and experiment with virtual hardware directly from your browser.
Let’s start with the program we just created. Run the simulation below, open the code editor, and watch the ESP32 communicate through the Serial Monitor.
Feel free to modify the messages, change the delay, or experiment with the code. There’s no hardware to damage here!
A small note: You can use the embedded simulator directly or open the project on Wokwi for a larger workspace.
Troubleshooting Common Problems
Sometimes the first upload doesn’t work. That’s normal when setting up a new development environment.
Here are a few common problems and what to check.
Problem: No serial port appears
Possible causes include a charge-only cable, a missing USB-to-serial driver, a faulty connection, or a board that is not being detected.
Try another data-capable cable and USB port first. Then check the operating system’s device list.
Problem: Upload fails to connect
Confirm that the selected port belongs to the ESP32.
If the board cannot enter download mode automatically, try holding the BOOT button as the upload begins, then release it when the upload process connects. The exact timing varies by board.
Problem: Compilation fails
Check the first meaningful error in the build output.
Common causes include incorrect code, a missing library, an incompatible framework API, or an incorrect project configuration.
If you copied the example exactly, also check that your platformio.ini selects an ESP32 board definition and the Arduino framework.
Problem: The Serial Monitor shows nothing
Check that:
- The upload completed successfully.
- The correct serial port is selected.
- The monitor baud rate matches
Serial.begin(115200). - The board has restarted and is running the program.
Some boards reset when the Serial Monitor opens; give the output a moment to appear.
Why We Are Using PlatformIO for This Series
You might wonder why we’re not simply using the Arduino IDE.
Both environments can be used to develop ESP32 projects. For this series, PlatformIO gives us a consistent project structure and configuration file that we can keep alongside our source code.
That becomes especially useful as our projects grow.
When we build a game on a TFT display, we may need display libraries, graphics libraries, board-specific settings, and multiple source files. Later, we may want to separate input handling, game logic, rendering, and hardware configuration into different files.
A project-based workflow makes these pieces easier to organize and reproduce.
The goal isn’t to make the development process unnecessarily complicated. It’s to establish a workflow that can grow with our projects.
What Comes Next?
We now have a working ESP32 development environment.
We know where the code lives, how the project is configured, how to build the firmware, and how to upload it to the board.
In the next article, we’ll move from printing messages to interacting with actual hardware.
We’ll explore GPIO outputs, inputs, and serial debugging through a practical first program. From there, we’ll build toward the sensor, display, and game projects that make this series exciting.
References
- Visual Studio Code: https://code.visualstudio.com/
- PlatformIO IDE for VS Code: https://docs.platformio.org/en/latest/integration/ide/vscode.html
- PlatformIO ESP32 platform: https://docs.platformio.org/en/latest/platforms/espressif32.html
- Arduino-ESP32 documentation: https://docs.espressif.com/projects/arduino-esp32/en/latest/
Comments
Share your thoughts, questions, or corrections below. Be kind and keep it on-topic ✨